NetworkedBlog
Showing posts with label FTU Kit Tutorials. Show all posts
Showing posts with label FTU Kit Tutorials. Show all posts
Thursday, June 5, 2014
 I Rise... FB Profile Pic & Timeline Cover Tutorial
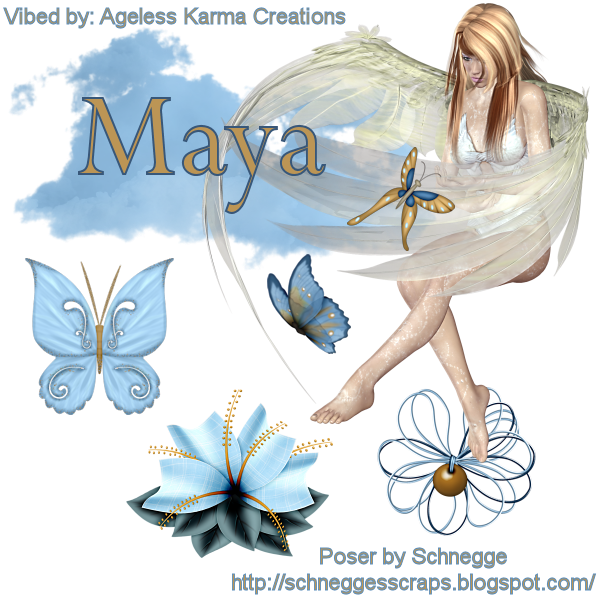
I am using the FTU Kit of Schnegge's Scraps called Angel In Heaven
I will be using the Poser that comes with the kit.
I will use C/P for Copy/Paste.
This tutorial will be for a Facebook Profile Pic & Timeline Cover
For the Facebook Timeline Cover:
Open a 851 x 315 transparent canvas
C/P Poser_AngelInHeaven_Schnegge & resize 60%
C/P Cloud_AngelInHeaven_Schnegge
C/P Butterfly1_AngelInHeaven_Schnegge & resize 40%
C/P Butterfly5_AngelInHeaven_Schnegge & resize 40%
C/P WireFlower1_AngelInHeaven_Schnegge
C/P Flower09_AngelInHeaven_Schnegge
C/P Buttefly3_AngelInHeaven_Schnegge & resize 60%
For the Facebook Profile Picture:
Open a 600 x 600 transparent canvas.
C/P Poser_AngelInHeaven_Schnegge
C/P Cloud_AngelInHeaven_Schnegge
C/P Butterfly1_AngelInHeaven_Schnegge & resize 40%
C/P Butterfly5_AngelInHeaven_Schnegge & resize 40%
C/P WireFlower1_AngelInHeaven_Schnegge
C/P Flower09_AngelInHeaven_Schnegge
I am using the following colors for the Copyright & Watermark:
Foreground: #5a8dbb
Background: #bc9555
Stroke: 1.0
Font: Perpetua
Size: 8
Tag Name:
Foreground: #5a8dbb
Background: #bc9555
Stroke: 2.0
Font: Perpetua
Size: 48
I'd love to see your results of my tutorial.
Please send them to agelesskarmacreations@gmail.com.
Sunday, May 4, 2014
Tuff Girl FTU Kit Tutorial

Today, I am using a PTU toon tube by Keith Garvey called Tuff Toon.
You must have a license to use his work. You can get both at his site here.
The FTU kit I am using is by Tasha's Playground called Anarchy. You can get it at her blogspot.
I will be using C/P for Copy/Paste.
Open a 600 x 600 transparent canvas.
C/P frame2 & resize 60%.
Using your magic wand, click inside the left side of the frame.
Selections, modify & expand by 3.
C/P tube of choice.
Selections, Invert & delete on keyboard.
Selections, Select None.
Using your magic wand again, C/P your tube into the right side of the frame, as you did on the left side.
After you have done the Select None step, close off your background layer and merge visible.
Re-open your background layer.
Next, I have C/P my full tube.
Now I will add the elements.
C/P motorcycle & resize 60%.
C/P devilhorns & resize 60%.
C/P anarchy
C/P music
C/P heart2 resize 40%.
C/P lips & resize 40%.
C/P wordart & resize 40%.
C/P splatter
C/P BarbedWire
At this time, add the Artist info & your watermark, I will use:
Font: Arial
Size: 16
Stoke: 1.0
And for the Tag Name, I will use:
Font: Showcard Gothic
Size: 72
Stroke: 2.0
Colors for both:
Foreground: #365789
Background: #ce3844
I'd love to see your results of this tutorial. Please send them to agelesskarmacreations@gmail.com.
Thank you for taking a look at my tutorial. Happy PSPing!
Tuesday, April 15, 2014
Bad Girl Raven FTU Kit Tutorial

I am using the tube of Keith Garvey called Raven. You must have a license to use his work. You can get both at his website located here.
I am using Scrap Minikit 13 by Miriams-Scrap. Beautiful colors in this kit!
I will be using C/P for Copy/Paste.
I also used a drop shadow, you can use whatever setting you choose.
I will be using C/P for Copy/Paste.
I also used a drop shadow, you can use whatever setting you choose.
Open a 600 x 600 transparent canvas.
C/P ms-mk13-element 5 & resize 20%
C/P Raven & resize 80%
C/P ms-mk13-element 73 & resize 40%
C/P ms-mk13-element 39 & resize 40%
Duplicate this layer 2 times
C/P ms-mk13-element 102 & resize 20%
C/P ms-mk13-element 53 & resize 30%.
Colors:
Foreground: #000000
Background: #d54662
Copyright:
Font: Arial
Stroke: 1.0
Size: 20
Tag Name:
Font: Harrington
Stoke: 2.0
Size: 85
Thank you for taking a look at my tutorial. I'd love to see your results, please send them to agelesskarmacreations@gmail.com.
Saturday, January 5, 2013
FTU Love Is A Heartbreaker

I am using the amazing art work of Keith Garvey. This tube is called Robin. You can purchase the tube & a license to use his work at the link to his tube website.
The FTU kit I am using is called Heartbreaker by Justine of Creative Misfits Creations. Click the link for Justine's name to download.
I am also using Vix's Vix_Mask_Valentine1 mask. You can get it by clicking the link.
I will use C/P for Copy/Paste. Please use my tag as a guide as to where to place elements.
Open a 600 x 600 transparent canvas.
C/P Paper3.
Open your mask.
Layers, New Mask Layer, From Image.
Select your mask from the drop down menu & click ok.
Here, I closed off my background layer & merged what was visible.
Then I opened my back ground layer again.
C/P Frame & resize 60%/
Here I closed my merged layer.
Next, using your Magic Wand, click inside the frame.
Next, open your tube. Here, I used the closeup, but I mirrored her first.
Copy your tube & paste into frame. Position to your liking.
Resize 60%.
Open your merged layer again.
C/P flair & resize 50%.
C/P note & resize 25%.
C/P WordArt2 & resize 60%.
C/P flower. Duplicate & resize 25%.
C/P Stapled Heart & resize 30%.
Free rotate 35 degrees.
C/P Sticker & resize 40%.
C/P Fuzzy & resize 40%
C/P Fuzzy2 & resize 40%.
C/P String Flower2 & resize 30%.
Font used for Copyright & Watermark:
Arial
Forground: 247, 115, 181
Background: 79, 52, 92
Font Size: 11
Font Stroke: 1.0
Font Style: Bold
Font Used for Tag Name:
Foreground: 79, 52, 92
Background: 247, 115, 181
Font Size: 72
Font Stroke: 2.0
Font Style: Bold
I'd love to see your results of my tutorial. Please send them to agelesskarmacreations@yahoo.com.
Sunday, November 11, 2012
Time to Fly

I am using the FTU kit called Free Spirit by Black Widow Creationz.
The tube I am using is by Anne Stokes called Immortal Flight. It can be found on her Deviant Art website.
I will use C/P for Copy/Paste.
Please use my tag as a reference as to where to place elements.
Open a 600 x 600 transparent canvas.
C/P Frame1 & resize 70%.
Using your magic wand, click inside each frame & Selections, Modify, & Expand by 6.
With each Expansion of the frames C/P your tube to your liking. Selections, Invert & Delete on Keyboard.
C/P Rose1, Rose2 & Rose3 & resize 60%.
C/P Dragonfly2 & resize 40%.
C/P Dragonfly1 & resize 40%.
C/P HeartKeyChain, Mirror & resize 30%.
C/P HeartKeyChain2, & resize 30%.
C/P ButterFly1 & ButterFly2 & resize 40%.
C/P Sparkle & Sparkle2.
Don't forget to add the Copyright & your Watermark.
I used the font Arial for both.
The font for the Tag Name is: Falling in Love
The Colors I used are as follows:
Foreground: 72-46-76
Background: 45-56-176
I would love to see your results of my tutorial. Please send them to agelesskarmacreations@yahoo.com.
Monday, October 29, 2012
Fall Celebration

I am using the wonderful artwork of Keith Garvey.
This tube is called High Maintenance. You must have a license to use his work. To get a license & check out other tube please visit his site Garv-Girls PSP tubes.
I am using the kit Sweet Fall by Nicky of the Creative Misfits. You can download Sweet Fall here, just click the link & don't forget to leave some love.
I am using a mask called UFmask2 by Urban Fairytales.
I am using the font called Janda Celebration Script for the name.
Please use my tag as reference as to where to place your elements.
Open 600 x 600 transparent canvas.
C/P Paper 2 & resize to 80%.
Here I added my mask.
I love how the words came out!
Next, Merge your Group (your mask & paper) together.
C/P Sparkles
Add your tube of choice.
C/P Butterfly & resize 30%.
C/P Butterfly & resize 30%.
C/P Candyapple & resize 40%.
C/P Candysticks & resize 40%.
C/P Cupcake 6 & resize 35%.
C/P Cupcake 5 & resize 35%.
C/P Flower 1 & resize 40%.
C/P Flower 2 & resize 40%.
C/P Lolli 1 & resize 60%.
C/P Lolli 3 & resize 60%.
Last, add the Wordart Sweet Fall & resize 80%.
I used the font Arial for the Copyright & your Watermark.
Colors Used:
Foreground: Black
Background: 214 - 2 - 0
Colors Used:
Foreground: Black
Background: 214 - 2 - 0
I'd love to see your results from this tutorial. Please send them to agelesskarmacreations@yahoo.com.
Sunday, October 7, 2012
Haunted Area

I am using the artwork of Keith Garvey. This tube is called Witch & you can purchase it at his website. You will need a license to use his work.
I am using the FTU Jeepers Creepers Kit by HorsePlay Pastures. It's part of a blog train.
I will be using C/P for Copy/Paste.
Please use my tag as a reference to place your elements.
Open a 600 x 600 transparent canvas.
C/P hpd_JC_El6 & resize to 60%.
C/P hpd_JC_El13 & resize to 80%.
Here I added the Witch tube. I resized it to 70%.
C/P hpd_JC_El25 & resize to 30%.
C/P hpd_JC_El14 & resize to 30%.
C/P hpd_JC_El28 & resize 80%.
C/P hpd_JC_El27 & resize to 50%.
C/P hpd_JC_El29 & resize to 50%.
C/P hpd_JC_El3 & resize to 25%.
Font used for Tag: Halloween Spider
Foreground: Black
Background: hpd_JC_Paper3
Stroke: 1.0
Font Style: Bold
Font used for the Copyright & Watermark: Arial
Foreground: hpd_JC_Paper5
Background: hpd_JC_Paper6
Stroke: 1.0
Font Style: Bold
I'd love to see your results! Please send them to agelesskarmacreations@yahoo.com.
Kitty Party

I am using the artwork of Keith Garvey. The tube is called Bad Kitty You can purchase it & also get a license to use his work at the link above.
The FTU kit I am using is called Halloween Party & is by Black Widow Creationz & it is part of a blog train. Click the link to download.
You will also need WSL_Mask306 by Weescotlass Creations. Click the link & it will take you to the blog. Look for the link on the right hand side of the screen for WSL_Masks301 - 360.
I will use C/P for Copy/Paste. Please use my tag as a reference as to where to place elements.
Open a 600 x 600 transparent canvas.
First C/P BWC_HalloweenPartyBT_PP5 & then apply your mask.
Layers, New Mask Layer, From Image. Select your mask from the drop down menu & click ok.
C/P BWC_HalloweenPartyBT_EL19 & resize to 50%.
C/P your tube of choice.
If you are using the Bad Kitty tube, resize her to 43% & position her to your liking.
C/P BWC_HalloweenPartyBT_EL15 & resize to 20%.
C/P BWC_HalloweenPartyBT_EL11 & resize to 30%.
C/P BWC_HalloweenPartyBT_EL14 & resize to 30%.
C/P BWC_HalloweenPartyBT_EL12 & resize to 30%.
C/P BWC_HalloweenPartyBT_EL16 & resize to 30%.
C/P BWC_HalloweenPartyBT_EL3 & resize to 25%.
C/P BWC_HalloweenPartyBT_EL4 & resize to 30%.
C/P BWC_HalloweenPartyBT_EL2 & resize to 25%.
For the font, I will use one of the other papers.
Font: Halloween Bats
Foreground: BWC_HalloweenPartyBT_PP1
Background: BWC_HalloweenPartyBT_PP5
Stroke: 2.0
Font Size: 55
Font Style: Bold
Don't forget to add the Copyright & your Watermark
Font for Copyright & Watermark: Arial
Foreground: Black
Background: BWC_HalloweenPartyBT_PP4
Stroke: 1.0
Font Size: 12
Font Style: Bold
I'd love to see your results, please send them to agelesskarmacreations@yahoo.com.
Friday, July 20, 2012
Lil Emo FTU Collab Kit

I am using the FTU Collab of Black Widow Creationz called Opening Collab Free.
Please use my tag as a reference.
I will be using C/P for Copy/Paste.
C/P BWC_SPU_OpeningCollab_EL17 & resize 60%.
Using your Magic Wand, click inside the frame.
Selections, Modify & Expand by 6.
C/P BWC_SPU_OpeningCollab_EL3 & position to your liking inside the frame.
Pull EL3 down below the frame.
C/P BWC_SPU_OpeningCollab_EL6 & resize 20%.
C/P BWC_SPU_OpeningCollab_EL1 & resize 30%.
Free Rotate EL1 to the Left 30 degrees.
Duplicate & Mirror EL1
C/P BWC_SPU_OpeningCollab_EL14 & resize 30%.
C/P BWC_SPU_OpeningCollab_EL9 & resize 20%.
C/P BWC_SPU_OpeningCollab_EL2 & resize 20%.
C/P BWC_SPU_OpeningCollab_EL16 & resize 20%.
C/P BWC_SPU_OpeningCollab_EL13 & resize 20%.
Duplicate & position to your liking.
C/P BWC_SPU_OpeningCollab_EL15 & resize20%.
Duplicate & position to your liking.
C/P BWC_SPU_OpeningCollab_EL3 & resize 50%.
Don't forget to add the Copyright & your Watermark.
For the font for the Copyright, Watermark & the Tag Name:
Font: Emophonic
Foreground: 19-2-18
Foreground: 19-2-18
Background: BWC_SPU_OpeningCollab_pp1
Stroke: 2.0
Font Style: Bold
I'd love to see your work, please send your results to: agelesskarmacreations@yahoo.com.
Wednesday, April 4, 2012
Ageless Karma Creations Tutorial of Creative Scraps by Crys's An Emo Easter Kit (Part 2)

This is the second time I have used this kit (hence the Part 2 in the title).
The kit I am using is called An Emo Easter by Creative Scraps by Crys.
It is a FTU kit & can be found on her site here.
I am using the work of Ismael Rac. The tube is called Bunny. You can use a tube of your choice if you'd like. But, to purchase this tube, go to his site here. Please make sure you have a license to use his work.
Please use my tag as reference as to where to place elements.
Also, I will use C/P for Copy/Paste.
Lets start off with opening a 600 x 600 transparent canvas.
C/P sprinkles.
C/P Frame1, resize 70%.
Using your magic wand, click inside Frame1.
Selections, Modify & Expand by 8.
C/P tube of choice, using the close up.
If you are using the same tube as I am, please follow these instructions below:
Resize 70% & position the tube to your liking.
Selections, Invert, Delete on keyboard
Selections, Select None
C/P Cupcake, resize 40%.
C/P Balloon, Balloon2 & Balloon3. Drag below sprinkle layer.
C/P Butterflies, resize 40%.
C/P Eggshell, resize 40%.
C/P 2nd tube of choice & position to your liking.
If you are using the same tube as I am, I changed her hair a little just to be different.
Resize 80% & mirror.
C/P Butterflies2, resize 60%.
The font I used for the tag name is: PartybyTom.
The colors are as follows:
Foreground: Black
Background: #40d3de
Font Style: Bold
Stroke: 1.0
Don't forget to add the Copyright & your Watermark. I did those in the Arial font.
I'd love to see your results of this tutorial. Please send them to agelesskarmacreations@yahoo.com.
Monday, April 2, 2012
Ageless Karma Creations Tutorial of Creative Scraps by Crys's An Emo Easter Kit (Part 1)

The kit I am using is called An Emo Easter by Creative Scraps by Crys. It is a FTU kit & can be found on her site here.
I am using the work of Ismael Rac. The tube is called Pretty Easter HD01. You can purchase this tube at his site here. Please make sure you have a license to use his work.
I am also using a mask for this tutorial. The mask is called Vix_EasterMask20101 by Vixpsp & can be found here.
The font I am using for the tag name is called Palace Script MT.
The drop shadow I am using is: 6-11-80-2
Please use my tag as a reference as to where to place elements.
Also, I will use C/P for Copy/Paste.
To start off:
Open a 600 x 600 transparent canvas.
C/P Paper5 from the kit for your background.
Add your mask of choice.
Add your tube of choice. Add drop shadow to tube.
I will now start to add my elements from the kit.
Add a drop shadow of your choice to all elements.
- Butterflies: Resize 70%
- Butterflies2: Resize 70%
- Flower2: Resize 20%
- Candy: Resize 40%
- Candy2: Resize 40%
- Candy3: Resize 40%
- JellyBean: Resize 40%
I used the Arial font for the Copyright & Watermark.
Font Info are as follows:
Foreground: #000000
Background: #b25ad1
Style: Bold
Stroke: 2.0
I hope your have enjoyed my tutorial. I would love to see your results of this tutorial. If you'd like, please send them to agelesskarmacreations@yahoo.com.
Sunday, March 11, 2012
Lucky In Love Kit Tutorial

The kit I am using is called Lucky In Love by Creative Scraps by Crys. You can get it here.
The mask I am using is by Vicky, it is called cm-shamrockmask.
Please use my tag as reference as to where to place elements.
I will use C/P for Copy/Paste.
Open a 600 x 600 transparent canvas.
For the Mask, I used LIL_Paper4.
To apply your Mask:
C/P LIL_Paper4 as a new layer & go to Layers, New Mask Layer, From Image.
Then in the dropdown menu, find your mask & click ok.
Now to apply your elements.
C/P LIL_FlowerScatter2, Duplicate & Mirror your Duplicate.
C/P LIL_Frame3 & resize 60%.
C/P LIL_Littlegirl & resize 40%.
C/P LIL_Littleboy & resize 40%.
Make sure the little girl is above the little boy layer, looks like she's giving him a kiss on the cheek.
C/P LIL_rainbow & resize 30%.
C/P LIL_PotOgold & resize 30%.
Using your Magic Wand, C/P LIL_Teddy in the frame.
C/P LIL_tree & resize 40%.
C/P LIL_fence & resize 40%.
C/P LIL_grass & resize 40%.
C/P LIL_flower2 & resize 40%.
C/P LIL_flower & resize 40%.
C/P LIL_hat2 & resize 40%.
For the Copyright, Watermark & Tag Name I used the following:
Font: PZ_Clover.
Font Size: 72.
Font Style: Bold
Stroke: 2.0
Forground Color: 88-72-104
Background Color: LIL_Paper2
I would love to see your results of my tutorial. Please send all results to my email.
Tuesday, January 10, 2012
Purple Kreationz New Years Celebrations Kit

I am using the awesome work of Elias Chatzoudis. You can purchase his work here. Please make sure you have a license to use his work.
The kit I am using is called New Years Celebrations & was made by Purple Kreationz. You can get it from her website here. Thank you so much Purple for sharing your work.
Please use my tag as a reference as to where to place elements.
Also, I will use C/P for Copy/Paste.
Open a 600x600 transparent canvas.
C/P PK-NYC-F1 & resize to 70%.
Using your magic wand, click inside the frame.
C/P your tube of choice inside the frame. Position to your liking. If you are using the same tube that I am... resize to 50%.
SELECTIONS, INVERT & DELETE on keyboard.
SELECTIONS, SELECT NONE.
C/P PK-NYC-CLOCK1 & resize to 30%.
C/P PK-NYC-FIREWORK & drag to bottom layer & place behind frame.
C/P PK-NYC-LIGHTRAY2 & resize to 30%.
C/P PK-NYC-2012-2 & resize to 30%.
C/P PK-NYC-CHAMPAGNE & resize to 60%.
C/P PK-NYC-MASK2 & resize to 30%.
C/P PK-NYC-GLASSES & resize to 30%.
C/P PK-NYC-MUSICNOTES3 & resize to 30%. Place this layer below the champagne layer.
Add the Copyright & your Watermark.
Save As PNG file.
For my tag name (Adrienne), I used the following for the Font:
Font: Cocktail Bubbly
Foreground: 65-65-65
Background: 205-176-99
Stroke: 2.0
Drop Shadow: 4-8-70-9.00
Drop Shadow Color: 54-54-54
I hope you enjoyed making this tag as much as I did.
If you'd like to show me your results, feel free to send them to my email at agelesskarmacreations@live.com
Tuesday, October 25, 2011
Ageless Karma's Rock Tutorial - Amy Marie's Punk Mini Kit

I am using the FTU Mini Punk Kit of Amy Marie. You can get it here. Don't forget to leave some love for Amy!
I am using the tube Melancholy by OrkusArt. You can purchase his work here. You can use the tube of your choice.
In this tutorial, you will have to use my tag as reference to know where to place the elements.
To start off, I opened a new canvas of 600 x 600 with transparency checked.
I then, started adding my elements.
First element we will add is gems1AmyMariePunkMiniKit. It should go right in the middle of your canvas.
Next, add your tube. If you are using the OrkusArt tube that I am, resize to 63%. Shewill fit perfectly inside the gem. Move below gem layer.
Next, add the element wire1AmyMariePunkMiniKit. Resize to 95% & move below gem & tube layer.
Next, add the element skull4AmyMariePunkMiniKit. Resize to 50% & duplicate. Put one to bottom left corner of gem & take your duplicate & place at the top right hand corner of the gem.
Next, add element skull1AmyMariePunkMiniKit. Resize to 50% & duplicate. Put one to the bottom right hand corner of your gem & the duplicate goes at the top left hand corner of your gem.
Next, add element lollAmyMariePunkMiniKit2. Position loll2 above skull4 & place below skull4 layer. Duplicate & position both in the middle of the skull.
Next, add element lollAmyMariePunkMiniKit1. Position loll1 above skull1 & place below skull1 layer. Duplicate & position both in the middle of the skull.
Next, add element starspiarAmyMariePunkMiniKit. Resize to 60% & move down below tube layer.
Next, add element flameAmyMariePunkMiniKit. Resize to 60% & this layer should be below your tube layer as well.
Next, add element bow2AmyMariePunkMiniKit. Resize to 60% & free rotate 45 degrees to the left & place under the purple skull up on the top left hand side. Duplicate & take duplicate over to the top right corner & flip the bow. Then drag it back to the top & place under pink skull layer on the top right corner.
Add your copyright & your name. Save As a png. file.
For Amy Marie's name, I used the following:
Foreground: 154 - 103 - 182
Background: 243 - 68 - 160
Font: Rock
Font Style: Bold
Stroke: 2.0
Hope you had fun with this one. I know I did!
Sunday, October 23, 2011
Ageless Karma's 2011 1st Thanksgiving Tutorial

In this tutorial, I will use Amy Marie's Fall kit. You can get it here. I have chosen to use two of Ismael Rac's tubes. You can get his work here. You can use a mask of your choice. The font I will use is called Adorable. I also used a Word Art from Digital Designs by Vickie.You can get the Word Art here.
I will start off with a transparent canvas of 600 x 600.
I then applied my mask with Paper 10 from Amy Marie's Fall kit.
Next, I copied & pasted my two tubes Naughty Pilgrim & Hot Native Girl & re-sized them to 70%.
The elements I used are as follows:
AM doddle2 - re-size to 20% place at bottom left hand corner, duplicate & mirror
AM Acorns - re-size to 20%, place above & behind the Naughty Pilgrim, make the second acorn a little bigger, so maybe re-size to 50%
AM flower6, AM flower 8 & AM flower 9 - re-size to 20%.
Duplicate & mirror AM flower 8 & AM flower 9.
Place the flowers in the middle of the mask. Use my tag as reference to know where the placement of each element should be.
Add your Word Art from Digital Designs by Vickie.
Add your copyright & your name.
Save As for your blank & you done.
To add a name to the tag I used the following:
As I said before the font I used is Adorable. Use 130-118-46 for your foreground (stroke) & use 90-3-0 for your background. Put your stroke at 1.
Thank you for trying out my tutorial. Hope you enjoy it!
Subscribe to:
Comments (Atom)
Copyrighted
My Blinkie

I Gladly CT for:

Member Of the Following


CU Licenses


Places I Love to Visit