NetworkedBlog
Showing posts with label RAC. Show all posts
Showing posts with label RAC. Show all posts
Saturday, June 28, 2014
 PTU Happy Canada Day, Eh! Tutorial

I am using the beautiful kit of Cindy's Creative Designs called Canada Eh, you can get it at PFD .
I am also using the tube of Ismael Rac called 2013 BB Fun Summer.
You must have a license to use his work. You can get both at his site.
Open a 600 x 600 transparent canvas.
Using your magic wand, select the canvas.
C/P into selection ccd_fireworks1
Selections, select none.
Next, I went ahead and C/P my tube. I resize the tube to 40%.
C/P ccd_ballon1 & resize 40%.
C/P ccd_ButtonRibbon2 & resize 80%.
C/P ccd_fireworks3 & resize 45%.
C/P ccd_kite1 & resize 30%.
At this time, you can add the copyright information.
Settings for the Copyright:
Foreground: #fc1915
Background: #faf4f5
Font: Arial Black
Size: 11
Stroke: 2.0
Settings for the Tag Name:
Forground: #efefef
Background: #a81d1f
Font: Cooper Black
Size: 40
Stroke: 2.0
I'd love to see your results of this tutorial. Please send them to agelesskarmacreations@gmail.com.
Wednesday, May 22, 2013
CT Tag PTU Breaking Dawn Kit

I am using a beautiful PTU kit by Alika's Scraps & it is called Breaking Dawn. You can purchase it at Pimp My Tags W/Scraps Store.
I am using the Artwork of Ismael Rac. You must have a license to use his work. You may obtain one at his site.
For this tutorial, I will use C/P for Copy/Paste.
Use my tag as a reference to place elements.
Open a 600 x 600 transparent canvas.
C/P as18 resize 60%
Using your Magic Wand, click inside the frame
Selections, Modify, Expand by 4
C/P BellaBonusHD into the frame & place to your liking. I resized her to 40%.
Selections, Invert & Delete on keyboard
C/P EdwardCullenHD02 into the frame & place to your liking. I resized him to 45%.
Delete on keyboard
C/P as29 & resize 60%
Select your background layer & C/P as22 & resize 140%. Place to your liking.
Stay on that layer.
C/P as33 & resize 60%
C/P as09 & resize 60%
C/P as10 & resize 50%
C/P as15
C/P as23 & resize 70%
Add the Artist Copyright & your Watermark.
The setting I am using are as follows:
Font:
Arial for Copyright & Watermark
Size: 14
Stroke: 1.0
Twilight New Moon for Tag Name
You can get it at Dafont.com
Size: 72
Stroke: 2.0
Colors:
Foreground: #0b0706
Background: #811316
Font Style: Bold
I'd love to see your results of this tutorial. Please send them to agelesskarmacreations@yahoo.com
Sunday, April 14, 2013
True Blood 2013

I am using the wonderful work of Alikas Scraps. It is a PTU kit called Eternal Twilight.
I am using the Artwork of Ismael Rac. I can not find the kit on his site anymore. But, it is called XeracxTBXclusive. It is a True Blood kit & it cam with all three tubes I will be using in this tutorial.
I will be using C/P for Copy/Paste.
Use my tag as a reference to place elements.
I will add a small Drop Shadow to every layer.
Open a 600 x 600 transparent Canvas.
C/P as61
Using your Magic Wand, click inside the bottom frame.
C/P your tube of choice.
If you are using the same tubes as I am, I resized Bill to 60%.
Place to your liking.
Selections, Invert & Delete on keyboard.
Selections, Select None.
Again, if you are using the same tubes as I am, I will be using Eric next.
Using your Magic Wand, click inside the frame above Bill.
C/P Eric & resize to 60%.
Place to your liking.
Selections, Invert Delete on keyboard.
Next, using the Sookie tube, do the same as you did with Bill & Eric.
Next, close your background layer.
At this time, merge these layers together.
Then, resize to 75%.
Now, open your background layer.
Select your background layer.
C/P as62.
C/P as63.
On this layer, Flip Horizontally & Vertically.
Select your Merged layer &
C/P as22 & resize 80%.
C/P as14 & resize 40%.
C/P as25 & resize 50%.
C/P as47 & Free Rotate 90 degrees to the Right.
C/P as48 & Free Rotate 90 degrees to the Left.
C/P as29 & resize 50%.
C/P as79 & resize 40%.
C/P as39 & resize 40%.
C/P as40 & resize 40%.
This layer should go beneath the word beautiful, at the bottom of Bill's frame.
The font I am using for the Tag Name is: TrueBlood.
Size: 90
Style: Bold
Stroke: 2
At this time you can add your Copyright & Watermark.
I always use Arial as my font for this.
The colors I choose to use are as follows:
Foreground: aspaper12
Background: aspaper11
I'd love to see your results from this tutorial.
Please send them to: agelesskarmacreations@yahoo.com.
Sunday, April 7, 2013
PTU Diamonds Always...

I am using the PTU kit called Diamonds Are by Pimp'd Designz.
I am using the beautiful Artwork of Ismael Rac. The tube is called MMHD2012. It was a Bonus Tube that I got at his site. I did go to his site & I could not find it. If someone knows where it is, please let me know.
I will be using the font Magical Marilyn, you can get it at Dafont.
I will use C/P for Copy/Paste
Please use my tag as a reference to place elements.
I will be using the font Magical Marilyn, you can get it at Dafont.
I will use C/P for Copy/Paste
Please use my tag as a reference to place elements.
Open a 600 x 600 transparent canvas.
C/P pd-frame-01 & resize 60%.
C/P your tube of choice into the film frames.
If you are using the same tube I am:
the tube on the Left was resized to 60%.
the tube on the Right was resized to 16%.
C/P pd-diamond-02
C/P pd-flower-01 & resize 40%.
C/P pd-flower-02 & resize 25%.
C/P pd-stars-01 & resize 80%.
C/P pd-diamond-03
C/P pd-hearts-01 & mirror this layer.
Then resize 60%.
C/P pd-wa-01 & resize 80%.
C/P pd-stars-02
C/P pd-wand
C/P pd-bottle-01 & resize 40%.
At this time, you can add the Artist Copyright & your Watermark. I used the font Arial.
The colors I used are as follows:
Foreground: #ed72aa
Background: #000000
I'd love to see your results of this tutorial. Please send them to agelesskarmacreations@yahoo.com.
PTU Twilight 2013

I am using the PTU kit called Bella's Lullaby by Pimp'd Designz.
I am using the Artwork of Ismael Rac. When I purchased these tubes, they came in the Edward & Bella HD Pack. Rac does have the tubes individual & in a separate pack together with out a kit.
I am using the mask Vix_Mask357 by VIXPSP.
Please use my tag as a reference to place elements.
Open a 600 x 600 transparent canvas.
C/P pp05 & add your mask of choice.
Group these layers.
C/P clouds & resize 40%.
C/P Bella & resize 50%.
C/P Edward & resize 50%.
C/P swirl Mirror & Resize 50%.
C/P Butterfly & resize 25%.
C/P flower-04 & resize 30%.
C/P flower-02 & resize 40%.
C/P flower-03 & resize 20%.
C/P flower-01 & resize 20%.
C/P bow-03 & resize 20%.
C/P ribbon-charmed & resize 15%.
C/P bling-02 & resize 30%.
At this time, you can add the Artist Copyright & your Watermark.
At this time, you can add the Artist Copyright & your Watermark.
The font I am using for the Tag Name is called Twilight New Moon you can get it at Dafont.
Stroke: 2.0
Font Style: Bold
The font for the Copyright & Watermark is Arial.
Stroke: 1.0
Font Style: Bold
Colors for both are as follows:
Foreground: #7472aa
Background: #615065
I'd love to see your results of this tutorial.
Please send them to agelesskarmacreations@yahoo.com.
Saturday, August 18, 2012
Marilyn

I am using the beautiful kit of Creative Scraps by Crys called Spring Symphony.
I am also using the artwork of Ismael Rac. The tube is called MMHD2012.
I will use C/P for Copy/Paste.
Please use my tag as a reference to place elements.
First open a 600 x 600 transparent canvas.
C/P SS_Frame5 & resize 55%.
Using your Magic Wand, click inside the frame.
Selections, Modify & Expand by 5.
C/P your tube of choice.
If you are using the tube that I am, Resize MMHD2012 to 50%.
Selections, Invert & Delete on keyboard.
Selections, Select None.
C/P SS_Heartscatter & drag below frame layer.
C/P SS_Butterfly & resize 30%.
C/P SS_BirdCage & resize 50%.
C/P SS_clouds & resize 50%.
C/P SS_Flower & resize 40%.
C/P SS_Flower2 & resize 40%.
C/P SS_Flower3 & resize 40%.
C/P SS_HeartSquares & resize 30%.
C/P SS_MusicNotes & drag down below the merged layer or right above the SS_HeartScatter layer.
Don't forget to add the Copyright & your Watermark
I used the font Arial.
Tag Name:
Font: Channel
Foreground: Black
Background: SS_Paper9
I'd love to see your results, please send them to agelesskarmacreations@yahoo.com.
Wednesday, April 4, 2012
Ageless Karma Creations Tutorial of Creative Scraps by Crys's An Emo Easter Kit (Part 2)

This is the second time I have used this kit (hence the Part 2 in the title).
The kit I am using is called An Emo Easter by Creative Scraps by Crys.
It is a FTU kit & can be found on her site here.
I am using the work of Ismael Rac. The tube is called Bunny. You can use a tube of your choice if you'd like. But, to purchase this tube, go to his site here. Please make sure you have a license to use his work.
Please use my tag as reference as to where to place elements.
Also, I will use C/P for Copy/Paste.
Lets start off with opening a 600 x 600 transparent canvas.
C/P sprinkles.
C/P Frame1, resize 70%.
Using your magic wand, click inside Frame1.
Selections, Modify & Expand by 8.
C/P tube of choice, using the close up.
If you are using the same tube as I am, please follow these instructions below:
Resize 70% & position the tube to your liking.
Selections, Invert, Delete on keyboard
Selections, Select None
C/P Cupcake, resize 40%.
C/P Balloon, Balloon2 & Balloon3. Drag below sprinkle layer.
C/P Butterflies, resize 40%.
C/P Eggshell, resize 40%.
C/P 2nd tube of choice & position to your liking.
If you are using the same tube as I am, I changed her hair a little just to be different.
Resize 80% & mirror.
C/P Butterflies2, resize 60%.
The font I used for the tag name is: PartybyTom.
The colors are as follows:
Foreground: Black
Background: #40d3de
Font Style: Bold
Stroke: 1.0
Don't forget to add the Copyright & your Watermark. I did those in the Arial font.
I'd love to see your results of this tutorial. Please send them to agelesskarmacreations@yahoo.com.
Monday, April 2, 2012
Ageless Karma Creations Tutorial of Creative Scraps by Crys's An Emo Easter Kit (Part 1)

The kit I am using is called An Emo Easter by Creative Scraps by Crys. It is a FTU kit & can be found on her site here.
I am using the work of Ismael Rac. The tube is called Pretty Easter HD01. You can purchase this tube at his site here. Please make sure you have a license to use his work.
I am also using a mask for this tutorial. The mask is called Vix_EasterMask20101 by Vixpsp & can be found here.
The font I am using for the tag name is called Palace Script MT.
The drop shadow I am using is: 6-11-80-2
Please use my tag as a reference as to where to place elements.
Also, I will use C/P for Copy/Paste.
To start off:
Open a 600 x 600 transparent canvas.
C/P Paper5 from the kit for your background.
Add your mask of choice.
Add your tube of choice. Add drop shadow to tube.
I will now start to add my elements from the kit.
Add a drop shadow of your choice to all elements.
- Butterflies: Resize 70%
- Butterflies2: Resize 70%
- Flower2: Resize 20%
- Candy: Resize 40%
- Candy2: Resize 40%
- Candy3: Resize 40%
- JellyBean: Resize 40%
I used the Arial font for the Copyright & Watermark.
Font Info are as follows:
Foreground: #000000
Background: #b25ad1
Style: Bold
Stroke: 2.0
I hope your have enjoyed my tutorial. I would love to see your results of this tutorial. If you'd like, please send them to agelesskarmacreations@yahoo.com.
Tuesday, January 17, 2012
Ageless Karma Creation's - Rac's Yummy Naughty Valentine

In this tutorial, I am using the work of Ismael Rac. You can purchase the Yummy Naughty Valentine tube & the kit at his site here. Please make sure you have a license to use his work. You can also get a license at his site.
For this tutorial, I will use C/P for Copy/Paste. Please use my tag as a reference as to where to place elements.
Open the template, naughtyyummytempbyEFFdesigns.
Remove copyright layer & merge visible.
Resize canvas to 95%.
C/P sparkles.
C/P your tube of choice. If you are using the same tube as I am, resize to 75%.
C/P LOVE word art. Place at bottom of canvas.
C/P martini & resize to 30%.
C/P lovecuppy & resize to 20%.
C/P stawberry & resize to 30%. Duplicate 5 times & place your duplicates around your canvas.
C/P heartpop & resize to 20%.
C/P cuffs & resize 30%.
At this time, you can add the artist copyright & your watermark.
If you want to add a name to the tag, follow the directions below.
Font: Love Letters, you can get it here at dafont's website.
Stroke: 2.0
Foreground: 255-255-255
Background: 173-27-19
Font Style: Bold
I hope you enjoyed my tutorial. I'd love to see your work! Please submit your work to me at agelesskarmacreations@gmail.com.
Monday, January 9, 2012
Ismael Rac's Sexy Deer Kit

I am using the awesome work of Ismael Rac. You can purchase the tube & kit at his website here.
We will open a 600 x 600 transparent canvas.
I will use C/P for Copy/Paste.
Please use my tag as a reference as to where to place elements.
The first C/P Snow element.
Next, C/P Frame & resized to 50%.
Next, use your magic wand & click inside the frame.
Next, C/P your SexyDeerHD02 tube & resize to 40%.
Next, select SELECTIONS, INVERT, DELETE on keyboard, SELECTIONS, SELECT NONE.
Next, C/P tree2 & resize to 30%.
Next, C/P presents & resize to 30%.
Next, C/P bow & resize to 30%.
Next C/P candles & resize to 30%.
Next add your Copywrite & Don't for get to add your Watermark.
For the Font:
Foreground: 207-154-69
Background: 37-0-0
You can use a Font of your choice.
Hope you enjoyed doing this tutorial.
Friday, December 16, 2011
Ageless Karma Creations Tutorial with Amy Marie's Candy Cane Kit

I am using the PTU kit called Candy Cane by Amy Marie. You can get it here.
The tube is by Ismael Rac. You can get it here at his site. Make sure if you use his tubes that you have a license to do so.
The mask, DBV Xmas Mask 14 is by Designs by Vaybs. You can get it here. You will need to scroll down the page & find & download Xmas Masks 09-16.
Please don't forget to leave love for Amy & Vaybs!
In this tutorial, I will use C/P for Copy/Paste.
Please us my tag as a reference as where to place elements.
Open a new canvas using 600 x 600 with a transparent background.
To start off, open your mask & minimize.
Next, open & C/P paper, pp20.
Applying DBV Xmas Mask 14:
Select Layers at the top of your screen. Select, New Mask Layer. Then select, From Image. From your drop down menu select your mask. Make sure the box for Invert Mask Data is UNCHECKED. Click Ok.
Next, C/P your tube. If you are using the same tube as I am, resize her to 80%.
Next, select Layers & Merge & Merge Group.
Next, C/P candycaneplant & resize 30%.
Next, C/P garland1.
Next, C/P candycanewbells2 & resize 40%.
Next, C/P ball2 & resize 25%. Duplicate & mirror.
Next, C/P ball9 & resize 25%. Duplicate & mirror.
Next, C/P snowflake9 & resize 15%.
Last, C/P candycanestick2.
Don't forget to add your copyright & your watermark.
The font for Amy's name is as follows:
Font: Santasleighfull, you can get it here.
Font Style: Bold
Stroke: 1.0
Foreground: Black
Background: Paper pp1 from the kit.
I'd love to see your work! Please send all results to adrienneem@me.com.
I'd love to see your work! Please send all results to adrienneem@me.com.
Wednesday, November 2, 2011
Ageless Karma's Tutorial - Amy Marie's AM_PinkNPurple_Kitten Kit
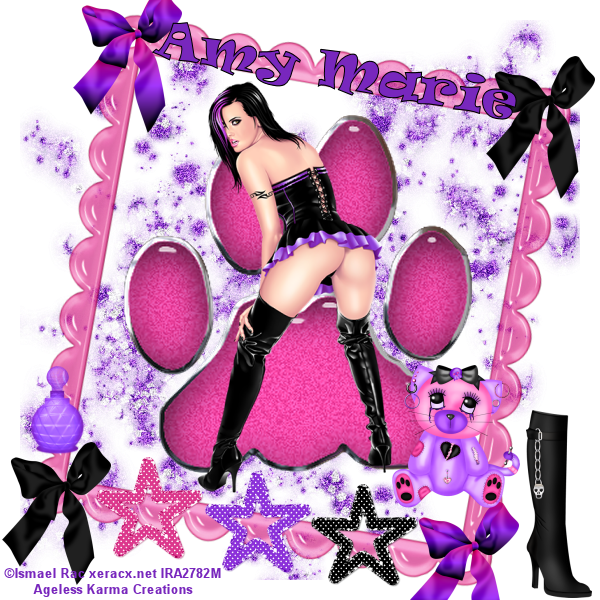
I am using the awesome work of Amy Marie. This is one of her PTU kits that you can get here at her blogspot.
I am also using the awesome work of Ismael Rac. You need a license to use his work, you can get that here.
Please use my tag for reference during this tutorial.
1. To start off, I used a 600 x 600 blank canvas.
2. Copy & Paste Frame5 & resize to 80%
3. Copy & Paste Glittersplatter2 & resize to 70%.
4. Copy & Paste Paw2 & resize to 130%.
5. Copy & Paste your tube of choice. I am using Jess by Ismael Rac. If you have chosen to use her, resize to 70%.
For steps 6 - 8, you will place these elements at the bottom of the frame side by side.
6. Copy & Paste glitterstar2 & resize to 40%.
7. Copy & Paste glitterstar1 & resize to 40%.
8. Copy & Paste glitterstar3 & resize to 40%.
Next...
9. Copy & Paste bow2 & resize to 30%. Place this bow at the top Left hand corner of the frame.
10. Duplicate bow2 & place your duplicate at the bottom Right hand corner of the frame.
11. Copy & Paste bow3 & resize to 30%. Place this bow at the top Right hand corner of the frame.
12. Duplicate bow3 & place your duplicate at the bottom Left hand corner of the frame.
13. Copy & Paste boots3 & resize to 40%. Place at bottom right hand corner of canvas next to the frame.
14. Copy & Paste emokitty & resize to 30%. Place above bow on bottom right hand corner of frame.
15. Copy & Paste bottle1 & resize to 30%. Place above bow on left hand bottom corner of frame.
Next add your copyright & your name. Save as png & your done.
For Amy Marie's tag name I used the following:
Font: Ravie. You can get it here.
Font Style: Bold
Stroke: 1.0
Foreground: Black
Background: 120 - 39 - 189
Free Rotate: 10 degrees to the Left
Place tag name at top of frame.
Save as png & your done.
Friday, October 28, 2011
Ageless Karma Creations - Amy Marie's Hard Rock Kit Tutorial

I am using the wonderful work of Amy Marie. This kit is called Amy Marie's Hard Rock. You can get this PTU kit here at her blog. Don't forget to leave her some love when you download. The template & elements I used are all in her kit.
The tube I am using is the wonderful work of Ismael Rac. You can purchase his work here at his website.
To start off, I used Amy Marie's HardRock Template. You will have to remove the copyright before you begin using it.
I added RAC's RockHard tube & placed her right in the middle at the bottom of the template.
I then started adding the elements around her. Most of the elements I opened, copied & resized down to 30%. I will list these now. Please use my tag as reference as to where to place these elements:
- Wingedheart
- note6
- note2
- note3
- Pick3
- PickHardRock
- spikedheart
- Amp1
- speaker1
- Butterfly
The last element to resize is the tophatskull. Open, copy & resize to 40%. Please use my tag as reference as to where to place this element.
The last element to add is the musicnotebar. I did not resize this element. It will be placed at the top of the template.
Add your copyright & your name. Save as png.
For Amy Marie's name, I used the following:
The font I used is the Twilight font. The stroke should be set at 1.0.
The Foreground is Black & the Background is Paper10 from the kit.
I hope you enjoyed this tutorial as much as I did. I LOVE making new things!
Sunday, October 23, 2011
Ageless Karma Creations October 2011 BCA Tutorial

I have used the work of Ismael Rac. You can get this tube on his site here as a free tube in his free tube section. Please make sure that you have a license to use his work.
I have used two kits on this tag. The first kit I used is by Bluedream Designs. It's called Bluedream Designs-BCA 2009 & you can get it here as a FTU kit.
The second kit I used is by Jo Designz. It's called Brest Cancer Awareness Scrap Kit - Taggers & Full sized - FREEBIE. It's the 3rd one down on the left hand side of the screen & you can get it here.
Other Supplies I used came with the tube it's self like the ribbon that says BCA on it.
You can use your mask of choice.
To start off we will open a new canvas of 600 x 600, make sure transparent is check.
I applied my mask first with Paper 9 from the BD-BCA2009 kit from Bluedream Designs.
Next, I copied & pasted my tube, BCA_Free_02.
I then copied, pasted & mirrored my elements.
-From the Bluedream Deigns kit
- BD-BCA2009-Charm1
- BD-BCA2009-Heart
-From Jo Desigz
-bow 2 small
-ribbon small
Next I copied the BCA ribbon from the BCA_Free_02 tube.
It is on the BCA layer of the tube. You will copy, paste & duplicate it & move it to the other side of the tube. Use my tag above as reference.
Now you can add your copyright & your name.
The font I chose for the name ADRIENNE is Impact. I wanted to make sure the pink ribbons showed in the middle of the letters. I made the foreground 203-44-112 & the background is Paper 9 that we used with the mask. Make sure your stroke is at 2.
Save As png file & your done.
Subscribe to:
Comments (Atom)
Copyrighted
My Blinkie

I Gladly CT for:

Member Of the Following


CU Licenses


Places I Love to Visit