NetworkedBlog


Showing posts with label Nov2011. Show all posts
Showing posts with label Nov2011. Show all posts
Friday, November 11, 2011
 Ageless Karma Creations - Fairy Fantasy Tutorial with Amy Marie's Pink Gold Kit
 Posted by
Unknown
Posted by
Unknown

I am using the Pink Gold PTU kit of Amy Marie. You can purchase it here.
I am using the amazing work of Cris Ortega. It is a FTU tube. If you'd like to get the tube I am using you can get it here. If you'd like to look at her website, please click here.
The font I am using is Elfring with a Stroke of 2.0.
You will need to use my tag as a reference to place your elements. I will use C/P for Copy & Paste.
1. To start off, open a 600 x 600 transparent canvas.
2. C/P lace frame1.
3. Use your magic wand & click inside of frame.
4. C/P tube of choice. If you are using the same tube as I am, resize her to 85%. Also, add a drop shadow of 9-14-70-9. The color I used is 214-49-108.
5. Use your move tool to position your tube where you want it in the frame.
6. Selections - Invert - Delete (on keyboard)
7. Selections - Select None
Next I added my elements.
8. C/P bubbles - resize to 95%.
9. C/P bubbles6 - resize to 95%.
10. C/P bubbles7 - resize to 95%.
11. Move all three below your frame layer.
12. C/P dragonfly1 - resize to 30%.
13. C/P glassbutterfly2 - resize to 30%.
14. C/P dragonfly4 - resiz to 30%.
15. C/P glassbutterfly - resize to 30%.
16. C/P glitterrose3 - resize to 30%.
17. C/P glitterrose4 - Mirror - resize to 30%.
Don't forget to add your name.
For the "Fairy Fantasy" & "Amy Marie", I used the font Elfring, Stroke - 2.0, Font Style - Bold.
Save as png. & your done.
I would love to see your creations. If you'd like to share your work, please send it to agelesskarmacreations@live.com.
 Labels:


Wednesday, November 9, 2011
Amy Marie's Devilina Purple Kit Tutorial

I am using the PTU Scrap Kit of Amy Marie. It is called Devilina Purple, you can get it here at her blogspot.
I am also using the amazing art work of Keith Garvey. You can purchase his work & a license to use his work here at PSP Tubes Emporium.
In this tutorial, C/P = Copy/Paste
To start off, open a 600 x 600 transparent canvas.
1. C/P starsprial2
2. C/P frame1 & resize to 70%
3. Use magic wand to select inside of frame
4. C/P tube of choice
5. Selections - Invert - Delete, to delete the rest of tube sticking out of frame
6. Deselect
For placements of elements, you can use my tag as reference.
7. C/P blingflower5, flower3 & flower1 & resize 20%, place in top left hand corner of canvas
8. C/P heartbutterfly & resize 40%, place in bottom left hand corner of canvas
9. C/P lipstick2 & resize 30%, place in top right hand corner
10. C/P doublebow & resize 30%, place at bottom center of frame
11. C/P bottlecapchain1 & resize 30%, place in bottom right hand corner of canvas
12. C/P bottle & resize 30%, place in bottom right hand corner
13. C/P corsetq & resize 30%, place in bottom right hand corner
14. C/P comb & resize 30%, place in top right hand corner
15. C/P hotlips2 & resize 30%, place under flowers in the top left hand corner. With this placement, it makes it look like a face!
For the copyright, I used Paper014 for the Foreground & Paper2 for the Background with Arial font.
Save As png your done.
For Amy Marie's tag name, I used Paper014 for the Foreground & Paper012 for the Background. I used the font Freestyle Script with a stroke of 2.0.
Thank you for taking the time to do this tutorial. I would love to see your work! If you'd like to send it to me, please send it agelesskarmacreations@live.com.
Wednesday, November 2, 2011
Ageless Karma's Tutorial - Amy Marie's AM_PinkNPurple_Kitten Kit
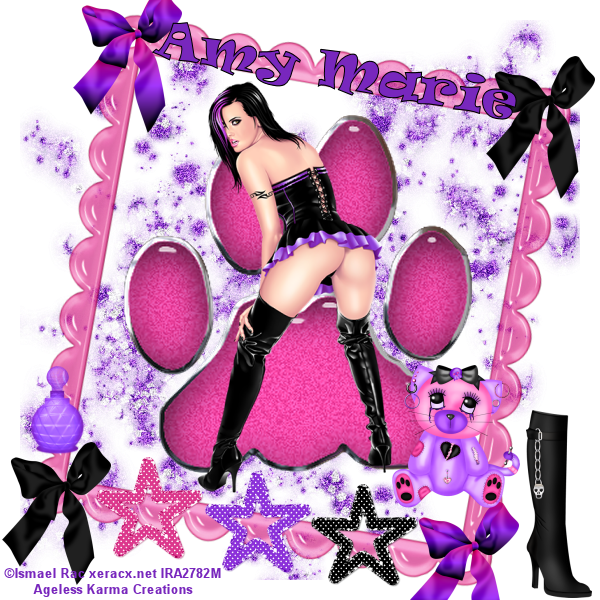
I am using the awesome work of Amy Marie. This is one of her PTU kits that you can get here at her blogspot.
I am also using the awesome work of Ismael Rac. You need a license to use his work, you can get that here.
Please use my tag for reference during this tutorial.
1. To start off, I used a 600 x 600 blank canvas.
2. Copy & Paste Frame5 & resize to 80%
3. Copy & Paste Glittersplatter2 & resize to 70%.
4. Copy & Paste Paw2 & resize to 130%.
5. Copy & Paste your tube of choice. I am using Jess by Ismael Rac. If you have chosen to use her, resize to 70%.
For steps 6 - 8, you will place these elements at the bottom of the frame side by side.
6. Copy & Paste glitterstar2 & resize to 40%.
7. Copy & Paste glitterstar1 & resize to 40%.
8. Copy & Paste glitterstar3 & resize to 40%.
Next...
9. Copy & Paste bow2 & resize to 30%. Place this bow at the top Left hand corner of the frame.
10. Duplicate bow2 & place your duplicate at the bottom Right hand corner of the frame.
11. Copy & Paste bow3 & resize to 30%. Place this bow at the top Right hand corner of the frame.
12. Duplicate bow3 & place your duplicate at the bottom Left hand corner of the frame.
13. Copy & Paste boots3 & resize to 40%. Place at bottom right hand corner of canvas next to the frame.
14. Copy & Paste emokitty & resize to 30%. Place above bow on bottom right hand corner of frame.
15. Copy & Paste bottle1 & resize to 30%. Place above bow on left hand bottom corner of frame.
Next add your copyright & your name. Save as png & your done.
For Amy Marie's tag name I used the following:
Font: Ravie. You can get it here.
Font Style: Bold
Stroke: 1.0
Foreground: Black
Background: 120 - 39 - 189
Free Rotate: 10 degrees to the Left
Place tag name at top of frame.
Save as png & your done.
Sunday, October 23, 2011
Ageless Karma's 2011 1st Thanksgiving Tutorial

In this tutorial, I will use Amy Marie's Fall kit. You can get it here. I have chosen to use two of Ismael Rac's tubes. You can get his work here. You can use a mask of your choice. The font I will use is called Adorable. I also used a Word Art from Digital Designs by Vickie.You can get the Word Art here.
I will start off with a transparent canvas of 600 x 600.
I then applied my mask with Paper 10 from Amy Marie's Fall kit.
Next, I copied & pasted my two tubes Naughty Pilgrim & Hot Native Girl & re-sized them to 70%.
The elements I used are as follows:
AM doddle2 - re-size to 20% place at bottom left hand corner, duplicate & mirror
AM Acorns - re-size to 20%, place above & behind the Naughty Pilgrim, make the second acorn a little bigger, so maybe re-size to 50%
AM flower6, AM flower 8 & AM flower 9 - re-size to 20%.
Duplicate & mirror AM flower 8 & AM flower 9.
Place the flowers in the middle of the mask. Use my tag as reference to know where the placement of each element should be.
Add your Word Art from Digital Designs by Vickie.
Add your copyright & your name.
Save As for your blank & you done.
To add a name to the tag I used the following:
As I said before the font I used is Adorable. Use 130-118-46 for your foreground (stroke) & use 90-3-0 for your background. Put your stroke at 1.
Thank you for trying out my tutorial. Hope you enjoy it!
Subscribe to:
Posts (Atom)
Copyrighted
 "Copyright ©AgelessKarmaCreations 2013
All rights Reserved"
"Copyright ©AgelessKarmaCreations 2013
All rights Reserved"
My Blinkie

I Gladly CT for:

Member Of the Following


CU Licenses


Places I Love to Visit


